

When I announced RGC-BASIC back in March, it was mainly a terminal-based BASIC interpreter written in C. You could run BASIC programs on Windows, Mac, and Linux, do file I/O, pipe data in and out, and write shell scripts in BASIC like some kind of maniac.
That was fun, and I was using it daily, but I kept going.
In the weeks since that post went up, RGC-BASIC has gained a graphical extension with full PETSCII rendering, sprites, bitmap graphics, gamepad support, an 80-column mode, and the ability to run your programs directly in a web browser.
You can even embed your programs into WordPress posts and pages. Try the RUN button below:
There is now a full, searchable documentation website for the Retro IDE and the languages included at Docs.RetroGameCoders.com, and of course RGC BASIC is featured. Oh, and I am working on an interactive tutorial you can try without installing anything.
Here’s the full story.

The Graphical Interpreter (basic-gfx)
The original interpreter ran in the terminal, but I wanted to create games.
So I built basic-gfx, a second build of the interpreter that uses Raylib.
For C64 fans it allows you to use your CBM BASIC and renders a 40×25 character display using the actual C64 character ROM bitmaps. POKE to screen memory at $0400, POKE to colour RAM at $D800, and it all shows up in the display. PETSCII control codes, reverse video, colour changes, the lot.
It still runs on all three platforms. If you want to compile for yourself and have Raylib installed you can build it with make basic-gfx. The desktop window closes when your program hits END.
This also meant the .seq art viewer example finally looks correct. No more squinting at terminal Unicode trying to work out if that’s a quarter-block or a full-block character.
But it is not just for running C64 BASIC games on your desktop or in a browser window, it also allows you to do modern stuff with PNG graphics …

You can now follow the tutorials and edit the code right in your web browser with the Online Retro IDE
– No downloads, configuration, etc necessary, and it is free!
Bitmap Graphics and Sprites
Once the graphical window existed, I couldn’t help myself. Phase 3 was supposed to be “later” but ended up being “the next weekend.”
You get a 320×200 bitmap. Drawing commands are what you’d expect:
SCREEN 1
PSET 160, 100
LINE 0, 0 TO 319, 199
Then came sprites. These are PNG-based, so load any image you like:
LOADSPRITE 1, "player.png"
DRAWSPRITE 1, 100, 80
SPRITEVISIBLE 1, 1
Each sprite has a slot, a position, z-ordering, optional source rectangle cropping, and alpha blending over the PETSCII or bitmap layer underneath.
SPRITECOLLIDE(a, b) will tell you if two sprites overlap, which is all you really need for most game collision logic.
For bigger projects there’s tilemap support. You can load a sprite sheet with tile dimensions and draw individual tiles from it:
LOADSPRITE 1, "tiles.png", 16, 16
DRAWSPRITETILE 1, 32, 64, 5
SPRITEFRAME lets you set a default tile for a slot, and SPRITEW/SPRITEH return the tile dimensions when a tilemap is active. Enough to build a proper tile-based game.
Viewport Scrolling
SCROLL dx, dy shifts the graphics and sprites by that many pixels. SCROLLX() and SCROLLY() read back the current offsets. Both the Raylib build and the WASM browser canvas support it.
Combined with sprites and tilemaps, you’ve got the basics for side-scrollers, overhead RPG maps, and that sort of thing. I’ve included simple tutorial examples for this.
Gamepad Support
This one was almost accidental. Once sprites and scrolling were working, the next obvious question was “how do I control this with a gamepad?“
JOY(port, button) reads button state and JOYAXIS(port, axis) reads analog sticks (scaled to -1000 to 1000). In the native build it uses Raylib’s gamepad handling. In the browser version, canvas.html polls navigator.getGamepads() each frame and maps Standard Gamepad indices to the same button codes.
IF JOY(1, 0) THEN PRINT "Button A pressed"
A = JOYAXIS(1, 0) : REM left stick X axis
There’s a gfx_joy_demo.bas in the examples folder if you want to test your controller.
It Runs in Your Browser
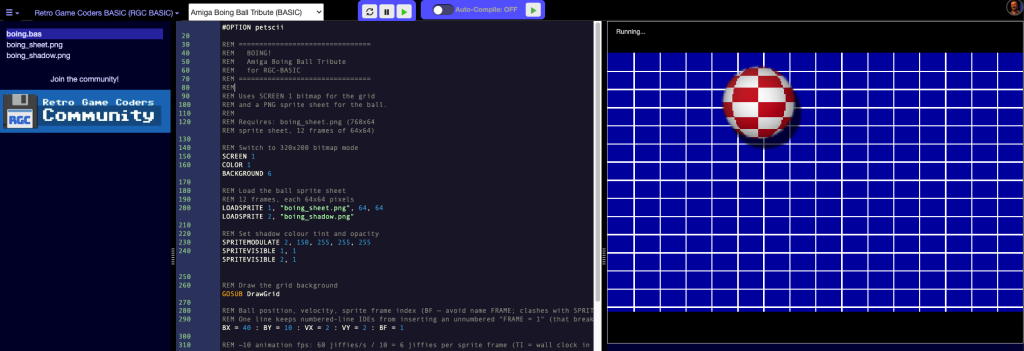
This is probably the biggest deal in terms of who can actually try it out. RGC-BASIC now compiles to WebAssembly using Emscripten, and there are two browser builds.
The “terminal” build (basic.js/basic.wasm) gives you raw text-mode I/O when embedded in an HTML page, including INPUT and GET. The canvas build (basic-canvas.js/basic-canvas.wasm) gives you the full PETSCII display, bitmap graphics, and sprites in a browser canvas element. You can pause, resume, and stop programs. The canvas even supports keyboard polling options via PEEK, so all kinds of game loops will work.
Getting Star Trek running in the browser was a good stress test of character-based games. That program hammers string and array operations, packs dozens of statements onto single lines, and runs long PRINT sequences. A fair amount of yield tuning went into making it not freeze the browser tab while the galaxy generates.
I’ve also started putting together an interactive getting-started tutorial that has eight embedded interpreters on one page. You can edit and run the example programs right there. Ctrl+Enter /Cmd+Enter runs the code. No downloads, setup, or installation needed.
Based on that concept, I added a WordPress “Gutenberg” block so I can embed these tutorial interpreters directly into blog posts on the Retro Game Coders site from here on out.
80-Column Mode
The default display is 40 columns, like the C64 and siblings. But you can switch to 80 columns with:
#OPTION columns 80
Or from the command line with -columns 80. This works in the terminal, in basic-gfx (which opens a 640×200 window), and in the browser canvas build. TAB zones scale accordingly: 10-column zones at 40 cols, 20-column zones at 80.
If you want to turn off wrapping entirely, there’s #OPTION nowrap too.
Structured Programming Features
The announcement post showed off IF ELSE END IF and WHILE WEND. Since then I’ve added a few more things that make the language more comfortable for longer programs.
User-defined functions:
FUNCTION factorial(n)
  IF n <= 1 THEN RETURN 1
  RETURN n * factorial(n - 1)
END FUNCTION

PRINT factorial(10)
Multi-line, multi-parameter, recursive. Brackets are always required on the call.
DO ... LOOP is in there now, too:
DO
  INPUT "Guess"; g
  IF g = secret THEN PRINT "Got it!"
LOOP UNTIL g = secret
With EXIT to break out of the innermost loop. Nested DO/LOOP should work fine.
New String and Array Commands
Version 1.5.0 brought a bunch of utility commands that were missing and annoying to work around:
REPLACE(str$, find$, repl$) replaces all occurrences in a string. TRIM$, LTRIM$, RTRIM$ strip whitespace. FIELD$(str$, delim$, n) pulls out the Nth field from a delimited string, which is handy for parsing CSV-style data or command output.
For arrays: SORT arr sorts in place (ascending or descending, alphabetic or numeric). SPLIT and JOIN convert between strings and arrays. INDEXOF and LASTINDEXOF search arrays and return 1-based positions.
There’s also JSON$(json$, path$) for pulling values out of JSON strings by path, and EVAL(expr$) for evaluating a string as a BASIC expression at runtime. ENV$(name$) reads environment variables and PLATFORM$() tells you what system you’re on.
#OPTION Meta Directives
Programs can now set their own options at load time using # directives:
#OPTION petscii
#OPTION charset lower
#OPTION charset pet-lower
#OPTION columns 80
#OPTION maxstr 255
#INCLUDE "mylib.bas"
The shebang line (#!/usr/bin/env basic) is recognised (and ignored in the browser), so BASIC shell scripts work. #INCLUDE splices another file in at that point, relative to the current file. Duplicate line numbers or labels between included files will produce an error.
Runtime Error Hints
When you hit a runtime error now, the interpreter prints a Hint: line on stderr explaining what probably went wrong. This turned into a bigger job than I expected because I went through and added hints for basically everything.
Wrong number of arguments to a function? The hint tells you the expected syntax. Type mismatch? It tells you what it got and what it expected. Tried to use SPRITECOLLIDE in terminal mode? It tells you that you need basic-gfx or the canvas WASM build.
These cover pretty much every statement and function in the language. I think. In the browser builds, hints appear in the output panel alongside the error.
HTTP Requests from the Browser
The browser WASM build now has HTTP$ for making fetch requests:
R$ = HTTP$("https://api.example.com/data")
S = HTTPSTATUS()
IF S = 200 THEN PRINT R$
It supports GET, POST with a body, and returns the status code through HTTPSTATUS(). On the native build HTTP$ just returns an empty string because you have the much more capable EXEC$("curl ...") there instead.
Configurable Memory Layout
By default the virtual memory map mirrors the C64: screen at $0400, colour at $D800, keyboard matrix at $DC00, and so on. But you can now change these:
#OPTION memory c64
#OPTION memory pet
#OPTION screen $0800
Or from the command line with -memory. Useful if you’re adapting programs from other CBM machines or just want a different layout for your own project.
What’s Next
The game-oriented features are coming together faster than I expected. The combination of sprites, tilemaps, scrolling, gamepad input, and collision detection in a cross-platform BASIC interpreter is enough to build actual games with. And the fact that the same code runs on your desktop and in a browser tab is a nice bonus.
There are still things on the list. Sound support is the obvious gap. I’d also like to improve the sprite system further and look at what it would take to package up desktop programs for distribution, or even transpile BASIC to C for targeting 8-bit hardware via cc65 or z88dk.
 Run a Modern + Commodore-Style BASIC Anywhere with RGC-BASIC (Not an Emulator)